3 Wire Alternator Wiring Diagram is pivotal for a vehicle’s electrical system. Drawing from my experience and expertise, I know that an alternator’s performance hinges on its wiring, specifically its connections to the battery, ignition, and voltage regulators. In the automotive world, data, knowledge, and information cannot be overlooked.
At Rich’s Body Shop, we’ve tackled everything from the basic 1-wire alternator to the intricate 3-wire system. The right connections – from the positive terminal to the battery wire, and the exciter wire’s ignition input – make all the difference. Ensuring each component, from rotor to rectifier, functions optimally is our specialty.
Dive with me into the intricacies of the 3 Wire Alternator Wiring Diagram in this article. Embrace the world of alternating current, field coils, and voltage regulators to optimize your vehicle’s electrical performance.
What is a 3 wire alternator wiring diagram?
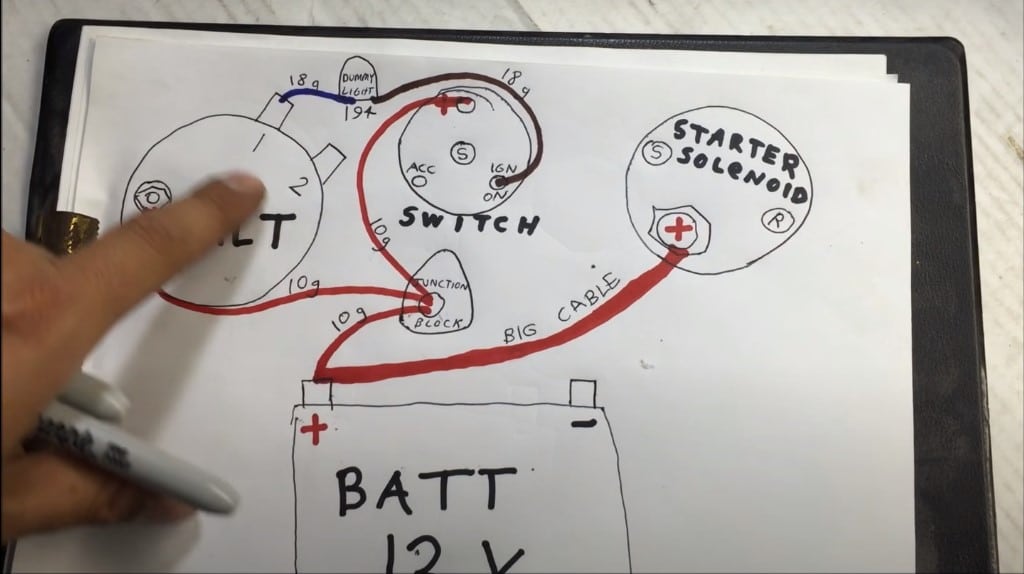
A 3 wire alternator wiring diagram is a comprehensive representation of the components connected to an alternator, as well as their connections. It shows the existence of three wires connecting to the alternator, with all other connected parts labeled distinctively in different colors. A proper alternator wiring diagram should include color designations for each component; for example, low-resistance cables may be blue or yellow, and battery cables could be white or red.
In addition, key components such as fuses and relays can easily be located by referring to a corresponding schematic in the wiring diagram. With careful study, understanding a 3 wire alternator wiring diagram need not be overly complicated, making it simple to quickly diagnose any electrical issues arising from this critical component.
You may be also interested in: What color is the ignition switch wire? at”https://www.richsautobodyshop.com/blog/ignition-switch-wiring-color-code/“
Understanding the Alternator Wiring Diagram
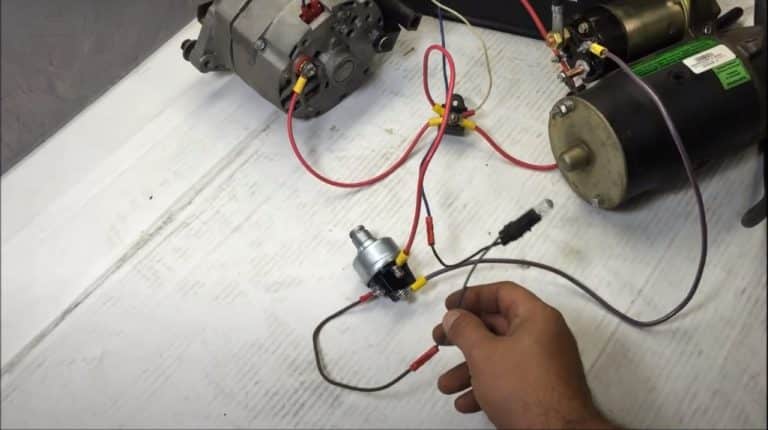
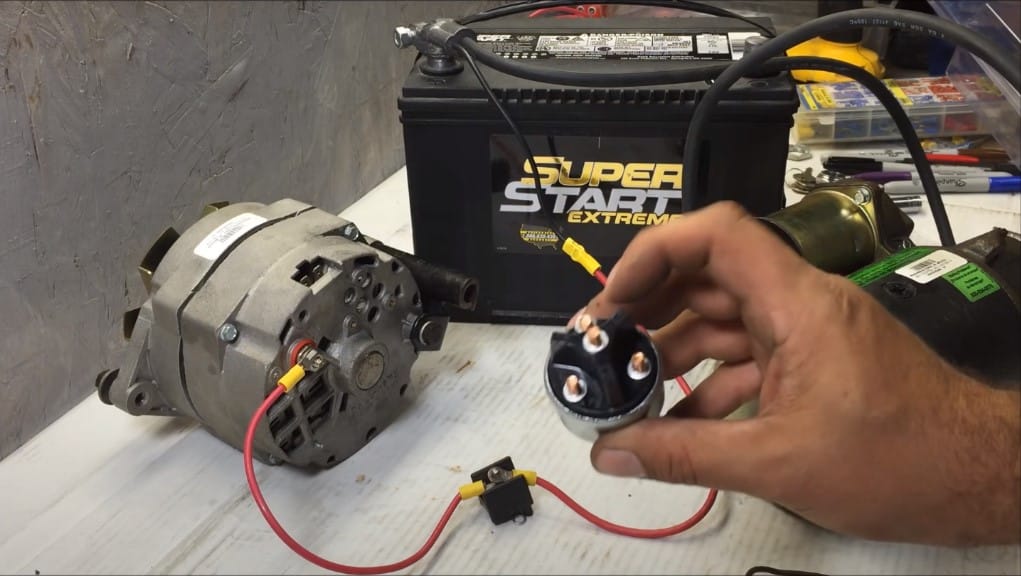
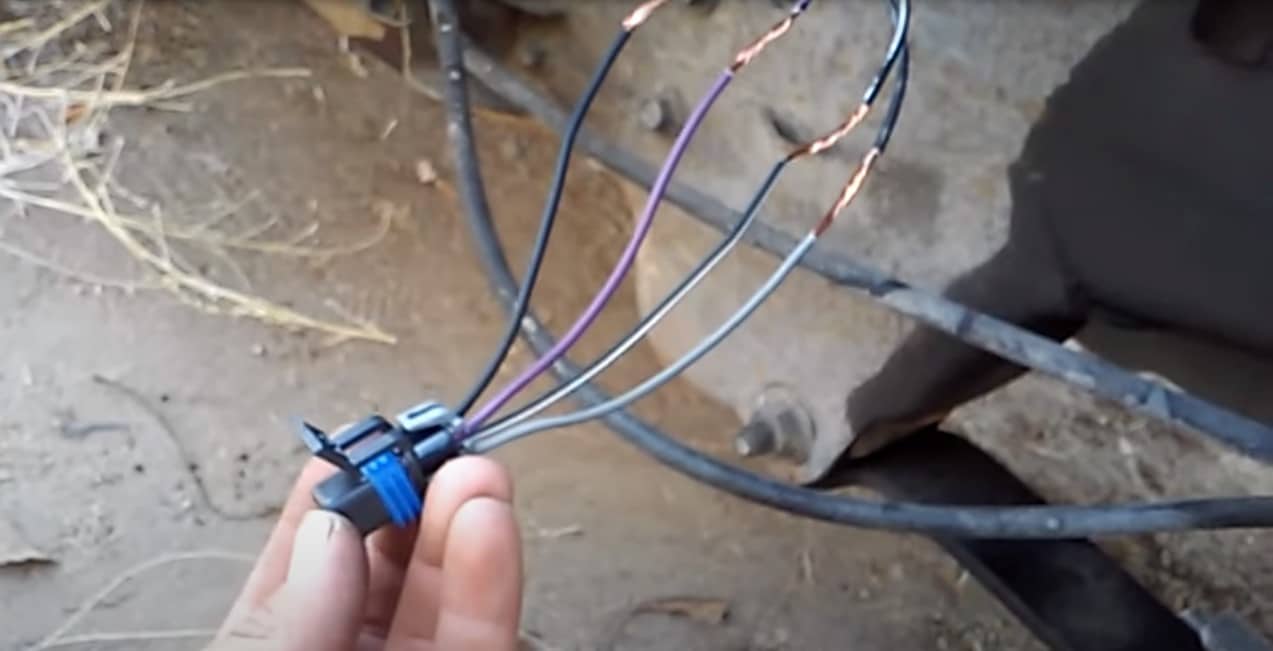
A 3 wire alternator wiring diagram is composed of several components. The most basic and important part is the red wire, which connects to the battery-positive terminal. The black wire connects to the negative terminal, and the yellow or green wire connects to the alternator’s stator/rotor supply. In addition, there are often auxiliary wires used for powering accessories like headlights, as well as other options such as a tachometer connection or voltage regulator cables.
Along with that, you should also learn about “4 Wire Alternator Wiring Diagram“
It is essential that you understand where each of these wires should be connected in order to ensure your vehicle’s electrical system runs properly. In some cases, it may be necessary to unscrew certain components or remove plastic shields in order to access the alternator wiring.
When connecting the wires, it is important to ensure that all connections are done properly and securely, with no loose wires. Careful inspection of a 3 wire alternator wiring diagram will help you identify any potential issues and make sure your vehicle runs optimally.
By following this guide and referring to your 3 wire alternator wiring diagram, you can make sure that your car’s electrical system runs smoothly and efficiently for years to come. This way, you can enjoy worry-free motoring with peace of mind.
How to wire a 3 wire alternator
If you’ve ever gone under the hood of a car, then you’ll know that there are many parts and components at play. One such component is the alternator – an electrical generating device that helps charge and power your vehicle’s battery. But did you know that wiring up a 3 wire alternator can be as easy as pie? Below, we will provide an informative step-by-step guide on how to efficiently connect one up with precision.
Step 1: Get the Required Components
Before you begin, make sure you have all of the necessary components on hand. Typically, these will include a 3 wire alternator, battery cables (red and black), and an appropriate fuse. You may also need to acquire a few additional items such as a brush guard, voltage regulator, and tachometer if you plan on using those functions. Be sure to double-check that all parts are in good condition before beginning your project.
You should find more useful knowledge about “2 Pin Alternator Wiring Diagram“
Step 2: Disconnect the Battery
Safety should always be your number one priority when working with electrical systems. Therefore, it is essential that you disconnect the negative terminal from the battery before starting work on any wiring projects. This will help ensure that no current flows through which could cause serious injury or damage to your vehicle.
Step 3: Connect Red Wire
Once all necessary components have been gathered and the battery has been disconnected, begin by connecting the red wire from the alternator to the positive terminal of the battery. If a brush guard is being used, connect it here as well before screwing it down tightly with a wrench or socket.
Step 4: Connect Black Wire
Next, attach the black cable from the alternator to a ground point on your frame. This could be any location that is firmly grounded and corrosion-free. You can use either an existing grounding point or tap into one if needed. However, make sure that you don’t exceed more than 10 gauge for this wire size.
Read more: Color coding Ford wire harness color code
Step 5: Connect Yellow/Green Wire
Finally, connect the yellow or green wire from the alternator to your vehicle’s ignition system. This will usually be a 12-volt source and can easily be identified on your wiring diagram. Once everything is connected, check that all connections are secure and reattach the negative terminal of the battery.
By following these steps and consulting with an appropriate 3 wire alternator wiring diagram for further guidance, you should have no problem getting your car up and running in no time. The process may seem complicated at first but it is certainly not insurmountable – as long as safety remains paramount throughout. With a bit of patience and technical know-how, you should have a working electrical system before you know it.
Why do you need a 3 wire alternator wiring diagram?
A 3 wire alternator wiring diagram can be hugely beneficial when it comes to connecting up your vehicle’s electrical system. It provides all the information needed for a successful installation, eliminating most of the guesswork and ensuring that there are no loose connections or potential hazards.
Furthermore, diagrams help you identify any potential issues in advance and make troubleshooting much easier should you encounter any difficulties down the line. All in all, having a comprehensive wiring diagram will save time and money in the long run.
In conclusion, wiring up a 3 wire alternator doesn’t have to be complicated – as long as you have all the right components and consult with an appropriate diagram before starting work. As long as safety is kept front of mind throughout, you should have no problem getting your electrical system up and running in no time.
What are the benefits of a 3 wire alternator?
Are you curious about the benefits of using a 3 wire alternator? We’ll start by discussing what makes a 3 wire alternator unique, then compare its features to other types on the market, before finally looking at some of its key benefits. So if you’re contemplating installing one on your own vehicle, read on – the information below will help equip you with all the information necessary to make an informed decision.
Durability
A 3 wire alternator is more durable due to its design. The three-wire system allows for separate current regulation, which helps reduce strain on the system and increase overall efficiency. This makes it much less likely to fail or wear down over time compared to two-wire systems.
Cost-Effectiveness
In terms of cost, a 3 wire alternator is far more budget-friendly than other types available on the market. While the initial investment may be slightly higher than that of two-wire models, you will save money in the long run with lower maintenance costs and fewer repairs needed over time.
Improved Performance
Using a 3 wire alternator will also result in improved performance thanks to its superior design. The three-wire system increases the alternator’s efficiency and power output, resulting in greater stability and improved electrical output. This is particularly important for vehicles with more complex electrical systems, such as those used in high-performance cars or motorbikes.
You can read more about “Single Wire Alternator Wiring Diagram“
Enhanced Safety
Finally, a 3 wire alternator offers enhanced safety compared to other models. The separate current regulation helps protect the system from overloads and short circuits, making it much less likely for any potential hazards to occur. This makes it an ideal choice for vehicles used in hazardous environments or ones with more complex electrical requirements.
Overall, the benefits of using a 3 wire alternator are clear. It is more durable, and cost-effective and offers improved performance and enhanced safety compared to other types available on the market. With all these benefits in mind, it is certainly worth considering if you’re looking for an efficient and reliable way to power your vehicle’s electrical system.
How to install a 3 wire alternator
Are you looking to upgrade the alternator on your vehicle? Do you know how to install a 3 wire alternator correctly? Installing an alternator is not a complicated process, but it’s important to do it right in order to ensure that your vehicle runs smoothly and safely. Below, we will be going through the step-by-step guide for installing a 3 wire alternator system. By walking you through each part of the installation procedure, we hope that you feel confident and knowledgeable when completing your own installation!
Step 1: Gather all necessary tools
Before beginning installation, be sure you have all the tools needed to complete the job. This includes a wrench set, screwdriver set, battery terminal cleaner, and optionally a wire crimping tool and soldering iron. Make sure that all your tools are in good condition before starting work.
Step 2: Disconnect the battery
The first step is to disconnect the negative terminal from your vehicle’s battery. This will prevent any electrical shocks or other issues while working on your alternator. Make sure that the negative cable is completely disconnected before proceeding with the installation.
Step 3: Remove the old alternator
Using a wrench set, remove all necessary bolts and hardware from the old alternator. Carefully remove it from its mounting location and set it aside for disposal.
Step 4: Install the new alternator
Now, you are ready to install your new 3 wire alternator. Place it in position carefully and securely with bolts or other necessary hardware that came with the unit. Make sure that all connections are tight and secure for optimal performance.
You can see more about “GM fuel pump power wire color codes“
Step 5: Connect the wiring
Next, you will need to connect your new alternator’s wiring. This is the most important step in installation and requires a bit of knowledge about electrical systems. Connect the black wire from the alternator to the negative terminal on your vehicle battery. Connect the red wire to the positive terminal and the white wire to a ground point. If you are unsure about where to connect each wire, consult your vehicle’s manual for further guidance.
Step 6: Test and finish the installation
Once all wiring is connected correctly, turn on your vehicle’s ignition and test the new alternator. If all connections are working properly, the new alternator should start up and begin supplying power to your vehicle. After testing, turn off the ignition and finish installing any other necessary hardware such as mounting brackets or covers.
Congratulations! You have successfully installed a 3 wire alternator in your vehicle. With proper maintenance, this unit should provide reliable power for many years to come. Be sure to check your wiring and connections regularly for the best performance.
Tips for installing a 3-wire alternator
Installing a 3-wire alternator is not overly difficult, but there are some tips you should keep in mind while working on the job:
- Always remember to wear protective eyewear and gloves when handling electrical components.
- Take your time and double-check all connections before powering up your vehicle.
- If you are unsure about any part of the installation, consult a certified professional for assistance.
- Replace all worn or corroded parts before attempting to install a new alternator.
- Check your vehicle’s manual for specific wiring diagrams and instructions.
By following these tips when installing your 3-wire alternator, you can be sure that the job is done right and your vehicle is running safely and efficiently.
Troubleshooting a 3 wire alternator
If you’re a car mechanic, you know that electrical system problems can cause all sorts of issues. The alternator is an essential part of the charging and electrical systems in your vehicle and when it fails or begins to run inefficiently, then it can lead to all kinds of frustrating issues. Below, we’ll take a look at how to troubleshoot three-wire alternators so that you can promptly identify any possible problems and get your customer’s car back on the road again.
Step 1: Check the battery and alternator connections
The first step is to inspect your battery and alternator connection. Make sure that all cable connectors are secure, clean, and free of corrosion. When in doubt, replace any worn or corroded parts before attempting to troubleshoot further.
Step 2: Test the alternator output
Once you’ve confirmed that all connections are secure and free of corrosion, test the alternator’s output. To do this, connect an accurate voltage meter or tester to the battery terminals. If the reading is less than 13 volts, then your alternator may be having trouble producing enough power.
Step 3: Inspect the wiring
If the output is below 13 volts, then it’s time to inspect your wiring. Make sure that all wires are securely connected and free of corrosion. If you find any broken or corroded wires, replace them immediately with new ones.
Step 4: Check for loose connections
Loose connections can cause intermittent electrical issues and should be checked immediately. Make sure that all connectors are securely connected and free of corrosion. If you find any loose connections, tighten them or replace them with new ones as necessary.
Step 5: Replace the alternator
If all else fails, then it may be time to replace your alternator. Make sure you purchase a replacement of the same model and output capacity as your current alternator. Once you have the new part, follow the appropriate installation instructions for a 3 wire alternator to ensure that it is installed properly.
By following these steps, you can quickly diagnose and troubleshoot any problems related to your three-wire alternator. It’s important to remember that safety always comes first when working on electrical systems, so always wear protective eyewear and gloves when handling any components.
FAQs about 3 Wire Alternator Wiring Diagram
Why does the alternator have 3 wires?
The three-wire alternator is a self-exciting alternator, meaning that the voltage exciter wire connected to the ignition switch supplies power to the system. This eliminates the need for an external regulator and simplifies the wiring process.
Does it matter which way I connect the wires?
Yes, it’s important to make sure that the wires are connected correctly in order to ensure a proper and safe installation. Always refer to your vehicle’s wiring diagrams or consult a certified professional if you’re unsure about any part of the installation process.
How many wires go to an alternator?
The number of wires that go to an alternator depends on the make and model as well as the type of alternator being used. Generally speaking, most three-wire alternators will have a ground wire, power wire, and exciter wire.
How do I know if my alternator is 3 or 4-wire?
The easiest way to determine whether your alternator is 3 or 4-wire is by counting the number of wires connected to it. If there are three, then it is a 3-wire alternator; if there are four, then it is a 4-wire alternator.
Can I run a wire from the alternator to the battery?
Yes, you can run a wire from the alternator to the battery as long as it is properly connected and insulated. Make sure that you follow all safety precautions and consult a certified professional if you’re unsure about any part of the process.
What happens when the alternator goes bad?
When the alternator goes bad, it can cause various issues with your vehicle’s electrical system. You may experience problems starting or running the engine, dimming lights on the dash, or a dead battery. If you suspect that your alternator is having trouble, be sure to get it inspected by a certified professional as soon as possible.
What is the small wire on an alternator?
The sensing wire performs a critical role in the alternator’s wiring system – it discerns how much electricity is produced to ensure optimum engine performance and reliability. Without this crucial piece of hardware, your vehicle could experience serious electrical disruptions that would compromise its operating ability.
What size wire should I use for the alternator?
The size of the wire used for an alternator depends on its output capacity. Generally speaking, a heavy-duty wire (at least 10 gauge) should be used for most applications. If you’re unsure about the size of wire to use, consult a certified professional or refer to your vehicle’s wiring diagram.
Is the alternator wiring difficult to install?
Installing an alternator wiring system can be a complex task, and should only be attempted by those with experience and technical knowledge of electrical systems. If you’re not confident in your ability to complete the job, it is recommended that you consult a certified professional for assistance.
Conclusion for 3 Wire Alternator Wiring Diagram
3 Wire Alternator Wiring Diagram has unraveled many complexities of a vehicle’s electrical dynamics. Drawing from my depth of experience and expertise, I genuinely feel that understanding this system is paramount for anyone passionate about vehicles. Delving deep into the realms of alternators, wires, and voltages, we’ve embarked on a journey of learning and discovery.
If this article has enriched your knowledge or proven beneficial, I encourage you to share the wisdom with friends, fellow car enthusiasts, drivers, and vehicle owners in your community. Your insights and experiences matter to us, so please, take a moment to leave a rating and share your thoughts in the comment section below. Every interaction, every star rating, and each comment fuels our passion and drives us to refine our content further. Your time and feedback are invaluable. Thank you for joining us on this enlightening voyage.

William Moore is an automotive specialist with two decades of experience, ready to give your car the care it needs. He understands all facets of auto maintenance and repair, from oil changes to brake jobs. Working with the latest tools and technologies, he provides complete service on all makes and models of cars. With his attention to detail and commitment to quality workmanship, you can expect excellent results.






I’m glad they mentioned the importance of safety when working with electrical systems.
Safety first, always! Having had my fair share of experiences, I can’t emphasize enough the importance of being cautious. Thanks for pointing that out!
Wiring an alternator seems complicated, but this article breaks it down nicely.
At first glance, wiring can indeed seem daunting. I’m thrilled that the article could break things down for you. We all start somewhere, and I remember my early days of grappling with such concepts.
I never thought about the benefits of a 3 wire alternator before. This article opened my eyes.
Sometimes it’s the things we overlook that have the most impact! I’m delighted that the article provided you with new insights.
Learning about the components of a 3 wire alternator was very interesting. Great article!
Thank you! Unpacking the components and understanding their function was a journey for me too. Your feedback makes the hard work so worth it.
I appreciate the step-by-step guide on how to wire a 3 wire alternator. Makes it easier to understand.
I’m glad you found the step-by-step guide helpful! My goal was to simplify the process for readers like you, drawing from my own experiences. It’s all about making it approachable for everyone.